I sell a few Mexican train domino sets on Etsy, and the complete set requires a full set of 12/12 dominoes, (that’s 91 tiles) and eight small train tokens which I obtain from Amazon, a center hub for the domino paths to start from and a nice wooden box to put all the handcrafted parts in.
The first sets that I made had maple dominoes. Those were made from solid wood that had been re-sawn in to thin strips, then edge glued together to form a small blank that I could get about 1/3 of a set from, so I needed three of these blanks to do one set. I figured there had to be a better way.
Now I had been doing CNC paths to cut the dominoes the whole time, so it wasn’t like I was trying to use a template and a drill press to cut the pips one at a time. Rockler sells such a template though for a smaller set (I have one) and it is very time consuming to use. I suppose if you only wanted to make one or two sets, that would be a way, but dozens of sets… well that just isn’t the best way.
I use V-Carve Pro from Vectric, and in this program design and outputting paths for the CNC was a snap. I created all the individual tiles one at a time and used the software to aid in centering and laying out the parts in some sort of order. Some fine tuning got the cut down to a really nice and reasonably quick process, even for three sets of tool changes per set of dominoes. I still though there has to be a better way. Well, how about Baltic Birch Plywood???
I chose the best plywood I could find at the woodworking stores, NOT the Big Orange Retail Giant (Home Depot) or the Blue Monster (Lowes). You cannot get this grade plywood in those stores, even if they say it’s that good, you cut into it and you WILL find voids in the plies. This that I used has no voids and is NOT cheap. A 24″ x 30″ x 3/8″ thick (called 12 mm) is $12.99 where I am. There are other retailers that sell a 60″ x 60″ piece for that, but I don’t know if it is the same stuff. I intend to buy some and find out though. One sheet is good for two complete sets of 12/12 dominoes and a few extra blanks for repair parts as needed.
One thing I learned to do before putting the plywood on the machine is to pre-finish the top side with a coat or two of clear polyurethane. This makes the cuts tear out much less, and also prepare for painting later.
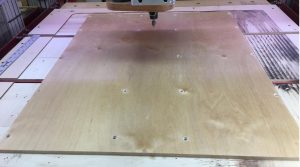
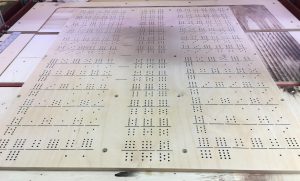
So here is a piece on my CNC machine with the hold down screws installed. There are 19 screws, they are in places that are strategically located to miss any tooling. They are calculated in the V-Carve software so I know they miss.
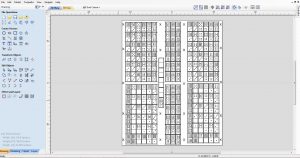
This picture is a screen shot of the whole board, and while you likely can’t read it, there’s a lot on there. There are small X marks that indicate safe screw locations, so the first board gets those. I drilled holes at those places and counter-sunk them and attached to my spoil board with small screws. All we need is the board to be flat on the table, no raised places to mess with the cut. Plywood is NEVER flat on its own, you have to hold it down some, even the best you find.
Here’s a look at the plywood on the table.
My tool path starts based on the center of the board, so there’s an X there that I drew using a straight edge from corner to corner. I zero my axis from that point for each tool. Once I find X and Y, those coordinates do not change, but Z has to based on the tools used. Each tool change requires a new Z calibration. There are many ways to do that, and some machines auto zero using a metal plate, mine will do that but I often do it by sight.
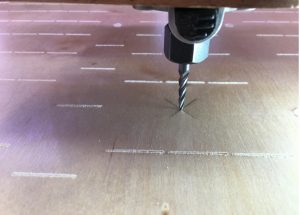
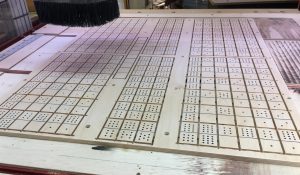
The first tool is a 60 degree V-bit. I use that to cut the dividing lines on each domino. I could do the pips first, but this is the order I like. Here’s a picture after the first cut has completed.
You can also see the next bit is a 0.125 Ball Nose End Mill. That is the cutter for the pips. There are 180 tiles that get at least one pip, and as many as 24. I have not calculated how many actual pips there are on one panel, but remember we’re doing two sets of tiles. This path will complete on my machine in about 45 minutes, and I’m not rushing the tool. I run about 70 IPM (Inches Per Minute) for many of these tools in all directions. There are several reasons for not going faster, but the main one is the quality of the cut on small tools vs the material being cut.
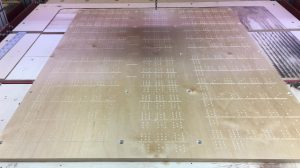
Here is a picture of the pips completed… but you can hardly see them as they’re not black yet.
Next we’re going to apply some black paint. I use a foam brush and push as much paint into the pips and grooves as I can, but keep it as thin as I can on the panel, we’re going to sand all that off soon, so no need to apply a ‘coat’ of paint here to get rid of. Make this coat thin enough to see through a little bit.
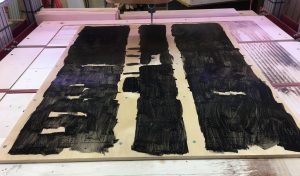
I know that doesn’t look very see through, but it really is pretty thin. It is black after all. I coated everywhere I want black to stay, but not the whole board. Now that the paint is dry, it’s time to sand it off, but don’t get too aggressive here, we don’t want to remove the pips (they’re only about 0.030″ deep).
Now that we’re sanded, we can cut the tiles out. I do not remove this from the machine during all this to prevent misalignment later, and even though we set coordinates, there is no guarantee we’ll land in the same place the next time for sure. I am now going to use a fairly expensive bit for this next cut. Up to now the bits are moderate, something like $25 each, so there’s a good value to how long they last. This next one is a different animal. It is an Amana Tool # 46176-K. Click the link to see the tool at Tools Today’s web site. This bit is a compression bit, which means is an ‘up-cut’ for the first part of the bit and a ‘down-cut’ for the rest. The first pass has to be deep enough to bury the up and down cut sections together to prevent tear out on plywood. Then you have to be sure you don’t over cut, you need to barely go through the panel. I set my machine to go through no more than 0.020 most of the time, and usually that is a proper allowance. This will cut into the spoil board, but that is what it’s for! Here’s a picture of the completed ‘cut-out’.
Now we can remove this from the machine and cut it apart. I have it laid out so that a left side and one half of the center is one set. The rest is the other set. There are five blanks there, two are used, the rest are parts for repairs later on if I need to make a single domino for some reason. I always make spare parts just in case. You will too if you’re smart. Now we move to the band saw to cut the parts apart.
So we’ve cut everything apart, now it’s time to do some sanding. I sanded the top and bottom already, so the edges are next. I mentioned in the video about tabs. These keep the parts from going every where while machining. This process is a bit tedious but goes quickly once you’re set up to go. You need a sander as shown in the next video (or similar) and a bit of patience, don’t get in a hurry here, but you’ll find that you get faster at this as you go.
Clean off your parts and you now have a complete set (or two) of 12/12 dominoes.
Do you have or sell the vcarve file?
As of now I’m not publishing my v-carve files, but at some point I may offer them for a small fee. I need to figure the best way for me to set that up.