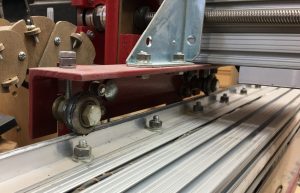
The original build of my machine called for linear movement rails of v bearings and aluminum angle with an inverted v shape on the edge where the v bearing rides as shown below. The bearings were fitted on the top and bottom of the extruded aluminum rails, and were fully adjustable for level and pretension.

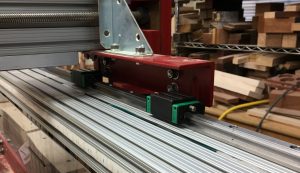
If you look closely, you can see aluminum dust along the inside of the angle, there is wear in the contact area no matter how you lubricate or clean this area. The down side also includes a constant need to maintain these bearings and keep adjustment proper. So in looking around online I found another style of linear movement rails that have blocks with small bearings along an “I” beam style rail. It has bearings in enough direction that the need for upper and lower bearing rails is not necessary, according to all I read. So I decided to retrofit my machine with a pair of these rails to see if I could make maintenance easier and the machine a bit truer in movement.

The rail shown is found on Amazon and other places online. They are Orange A Linear Rails. I’m told they are available in various lengths, and can be custom ordered for your size if needed. I bought the ones that are 60 inches and cut them down to my required 54 inches. They have 4 mm holes drilled through and can take a 7 mm head for a bolt. My hardware came from McMaster Carr. The fitment into the extruded aluminum rail was at question but the hardware I chose made the fitment quite good and there are enough bolts per linear inch to make the rail sturdy in the mount. The only real problem was distance between the rail and bearing block and my machine, so I made an adapter block from one inch phenolic material. The blocks are about 1.5 x 2.25 x 1 inch thick. You can drill and tap this material, so adapting it to the rails was easy. I did go to the trouble to resurface my spoil board after all the changes and found that these rails work very smoothly. The bearing blocks also have lubrication fittings, they can be greased, I would figure that some kind of lithium grease would go in there, but not so much to catch dust or leave the rails covered with something messy.
I think the next change is going to be add these same rails along the gantry, I will have to use upper and lower rails here, but I’m pretty sure this adaptation will be much easier than the last as the gantry connections are far easier to change, brackets are very adjustable.
Two weeks into using the new rails, the machine moves easier than before. I didn’t realize how the other rail system was beginning to have some rough spots as it moved, it didn’t seem to show up in the cuts I was making somehow but I can hear the machine move and it works smoother than before. The gantry rail change that I thought about is moving forward, I’ll post pictures of that when done and do another review of those changes when completed.

Thank you!!1